
Getting started
Setting up your portal
Here you'll find everything you need to know to get started with APIM gateway connectivity and basic site configurations. Our aim is to make the process as simple and straightforward as possible, so you can start building and deploying your portal quickly.
To get started, you'll need to have an API gateway that is compatible with DAC API Marketplace. DAC API Marketplace supports a wide range of API gateways, including AWS, Apigee, Apigeex, Kong, Mulesoft & Azure. Once you've connected your API gateway to DAC API Marketplace, you'll be able to sync your APIs with just a few clicks.
Before you start with API documentation, it's important to configure your site settings. DAC API Marketplace provides a range of customisable options, including site branding, menus, email templates etc. . We recommend that you take some time to review and configure these settings to ensure that your site is set up and meets your specific needs.
We're excited to see what you'll build. Let's get started!
APIM Connectivity
Set up an API gateway and configure
Login to the site as an APIM Administrator or Product Manager
Navigate to Dashboard > API Administration > Import APIs / API Products from the left sidebar menu
Select the API gateway you want to import from the list, which displays the number of previously imported APIs and API products for each gateway
The number of gateways allowed is based on the user selected Plan. If the user wants to switch the gateways after reaching the maximum limit, they need to contact us for the further assistance

Select the API gateway name and credentials from the list or menu tab, such as AWS Credentials. Once selected, click on Add a New Connection button to input the connection details in the available fields

Click the Submit button to save the credentials
To add more connections, select the Add a New Connection button. Click the Edit button to edit credentials. Click the Delete button to delete connection from list

Menus
Log in to the site as the Portal Administrator
From the left sidebar menu, select Dashboard > Site Administration > Menus. The page will have a list of every menu

To access the menu detail page and see a list of all menu links, click the Edit menu button

To change a menu link's label, click Edit, update the new label in the title field on the menu link detail page, and click Save
Taxonomy
Log in to the site as the Portal Administrator
Navigate to Dashboard > Site Administration > Taxonomy from the left sidebar menu. All vocabulary will be listed on the page

Edit Vocabulary
To edit any vocabulary, select the Edit option from the drop-down menu
Once the necessary changes are done, click Save

List Terms
To view all the taxonomy terms for a vocabulary, simply select List Terms from the drop-down menu, and they will be loaded onto the page

Click the Add Term button to add a new taxonomy term
Click the Edit button to update the taxonomy term
Click the Delete button to delete the taxonomy term
SMTP Authentication Support
Log in to the site as the Portal Administrator
Navigate to Dashboard > Site Administration > SMTP Authentication Support from the left sidebar menu

Configure the fields under SMTP server settings and SMTP Authentication
Under the Email options, set the default sender's email and name
Click the Save button to save the SMTP configuration
Account Settings
Login to the site as the Portal Administrator
Navigate to Dashboard > Users > Account Settings from the left sidebar menu
Scroll down to the Emails section. Click on the Email Template you want to change. For instance, welcome

You will find the detailed email template on the right side. Update the subject and body fields
Click on the other template you want to change
Once the desired templates are changed, click the Save Configuration button to save the changes
People
Add users and assign roles
Login as a Administrator, Portal Administrator and navigate to dashboard
Click on Dashboard > Users > People
Click on Add User button

Enter all the fields and roles

Click Signup
Deleting an user
Log in as a Portal Administrator, and navigate to the dashboard
View the list of users at Dashboard > Users > People

You can delete user by clicking on Delete User or edit which user account needs to be deleted
Click on Delete User to delete the user

When user click on Delete User, a popup will appear

After click of Confirm button user will get deleted and will show message Account has been deleted

Blocked users cannot log in again. When attempting to log in, a message will be displayed saying 'The username ekta.upc17aug has either been activated or is blocked'

Describe roles
Portal Consumer
To create an app, go to Dashboard > Apps > Create App
The app list can be seen under Dashboard > Apps > All Apps
APIM Administrator
To create the app, click Dashboard > Apps > Create App
To create the content, go to Dashboard > API Administration > Content > Add Content
To sync the APIs and products, select Dashboard > API Administration > Import APIs / API Products
Go to Dashboard > API Administration > Import APIs / API Products and click any of the gateways to provide the login information
Go to the Credentials tab after selecting any gateway. Complete the form and submit it
Before syncing the API, you need to sync the API products first
Go to the product page for Sync API
You will find two options Import selected API product(s) and Import all API products
Go to the Import APIs tab and import the desired APIs
Go to Dashboard > API Administration > API Products. Here the API gateway administrator can see the list of API products, and we can edit this product as well
Product Manager
To create an app, go to Dashboard > Apps > Create App
To create the content, click Dashboard > API Administration > Content
To sync the APIs and products, go to Dashboard > API Administration > Import APIs / API Products
Go to Dashboard > API Administration > API Products. You can see the list of API products and edit the product as well
Portal Administrator
Portal administrators will get dashboard access
For the dashboard page, click User Profile Block
You can create apps by going to Dashboard > Apps > Create App
To see a list of apps, go to Dashboard > Apps > All Apps
Also, users have the provision to edit and delete the app, go to Dashboard > Apps > All Apps
Every app has an edit and delete icon
You can create all content under Dashboard > API Administration > Content
Click on the Add content button
You can edit or delete the contents.
You can add media by going to Dashboard > API Administration > Content > Media
Once you select the media type and fill in the required fields, click the Add media button and save
That media will come under Dashboard > API Administration > Content > Files
You will get permission to edit the menus under Dashboard > Site Administration > Menus
Click the Edit Menu button, and then click Add Link to add the new menu link
You can add the new user under Dashboard > Users > People
Click the Add User button, fill in the required fields, and save
User lists will come under Dashboard > Users > People
Go to Dashboard > Site Administration > Taxonomy to add the taxonomy vocabulary and items
Click on Add vocabulary and give a name, then save
Dashboard > Site Administration > Taxonomy will appear here, then add the terms
Click on the List Term button, then click the Add Term button
Click on Dashboard > Site Administration > Dashboard Theme to access dashboard themes
You can set the default colors for the site's text, buttons, links, tables, pagination, and tabs here. This will apply to all pages. In the Logo Image box, you can also add a logo and a favicon
Go to Dashboard > Site Administration > Portal Theme if you have permission for the Portal theme
Files and Media
Login to the site as an Portal Administrator
Navigate to Dashboard > API Administration > Content > Files from the left navigation. Click on the Media tab. Click on Add Media

Select the type of media you want to upload

Fill in the required fields and click Save.

That media will be listed under Dashboard > API Administration > Content > Files

Dashboard Theme
For portal administrators, Click on Profile and go to Dashboard > Site Administration > Dashboard Theme
To add or customize a logo, use the logo image section to set the custom logo path or upload a new logo image
The Favicon section contains settings for the shortcut icon or favicon
To add any custom css user can upload css file through Import CSS file option or directly can add css in the editor
Changes which are added in this theme will get reflected to authenticated users

Portal Theme
For portal administrators, Click on Profile and go to Dashboard > Site Administration > Portal Theme
To add or customize a logo, use the logo image section to set the custom logo path or upload a new logo image
The Favicon section contains settings for the shortcut icon or favicon
To add any custom css user can upload css file through Import CSS file option or directly can add css in the editor
Changes which are added in this theme will get reflected to anonymous users

Custom Domain Settings
Login to the site as the Portal Administrator
Go to Dashboard > Site Administration > Custom Domain in your dev portal

Enter the domain name and upload the certificate and key. Make sure that the file types are allowed (cer and pem)
After you have uploaded the certificate and key, a notification email will be sent to the DevOps team. They will get back to you within 24 hours
You will receive three reminders as the SSL expiration date approaches
When the SSL certificate is about to expire, you can upload the updated certificate and key on the same page
Multilingual
Content Translation - (APIs, Apps, Articles, Basic page and Webinars):
Login to the site as the Portal administrator
Navigate to Dashboard > Site Administration > Content from the left sidebar menu

Click on the Edit arrow button and then click on the Translate option
Click on the Add button specific to the language that we need to translate

Add the translated content and click on Save
App Approval Configuration
Login to the site as a Portal Administrator
Navigate to Dashboard > Apps > App Approval Configuration from the left sidebar menu

In the App approval workflow, the portal admin has the ability to enable or disable automatic app approval
When automatic app approval is enabled, the app is approved automatically
If automatic app approval is disabled, the app will be in a pending state until approval
Navigate to Dashboard > Apps > App Approval from the left sidebar menu

When an app is in the pending approval state, the portal admin can either approve or reject the app

If the portal admin rejects an app, they must provide a reason for the rejection
Click on Edit button for selecting Approve or Reject option
If an app remains in a pending approval state, it is neither approved nor rejected

Once an app is approved, it may proceed to the next stage of the workflow

If an app is rejected, it will not progress further in the workflow

Using the trial version of DAC API Marketplace
These guidelines apply if you are using the trial version of DAC API Marketplace
Upon login, the portal administrator will receive a notification pop-up reminding them of the remaining days in their trial period, as well as a link to upgrade to the premium version

The plugin for trial mode enables users to use the website for a set duration of 30 days, which can be adjusted as needed
A maximum of 10 users can be registered for each trial instance
After the trial duration is over, the system will switch to read-only mode, where the user will be unable to add, edit, or delete content in the application

The user will only be able to view any content that has been created previously
Custom Error Pages
Login as Portal Admin
Navigate to Dashboard > Site Administration > Custom Error Pages. Here, you can configure settings for access denied, page not found, internal server error, and maintenance pages

Image removed. Click on "Access Denied." Portal admins can change the title, description, and image for the access denied page

Image removed. After adding the title, description, image, and link, the Access Denied page will display with the updated content

Similar changes can be made for different pages such as Page Not Found, Internal Server Error, and Maintenance Page by adding title, description, image, and link
Login / Signup page configuration
Login as Portal Admin
Navigate to Dashboard > Site Administration > Login/Signup page configuration
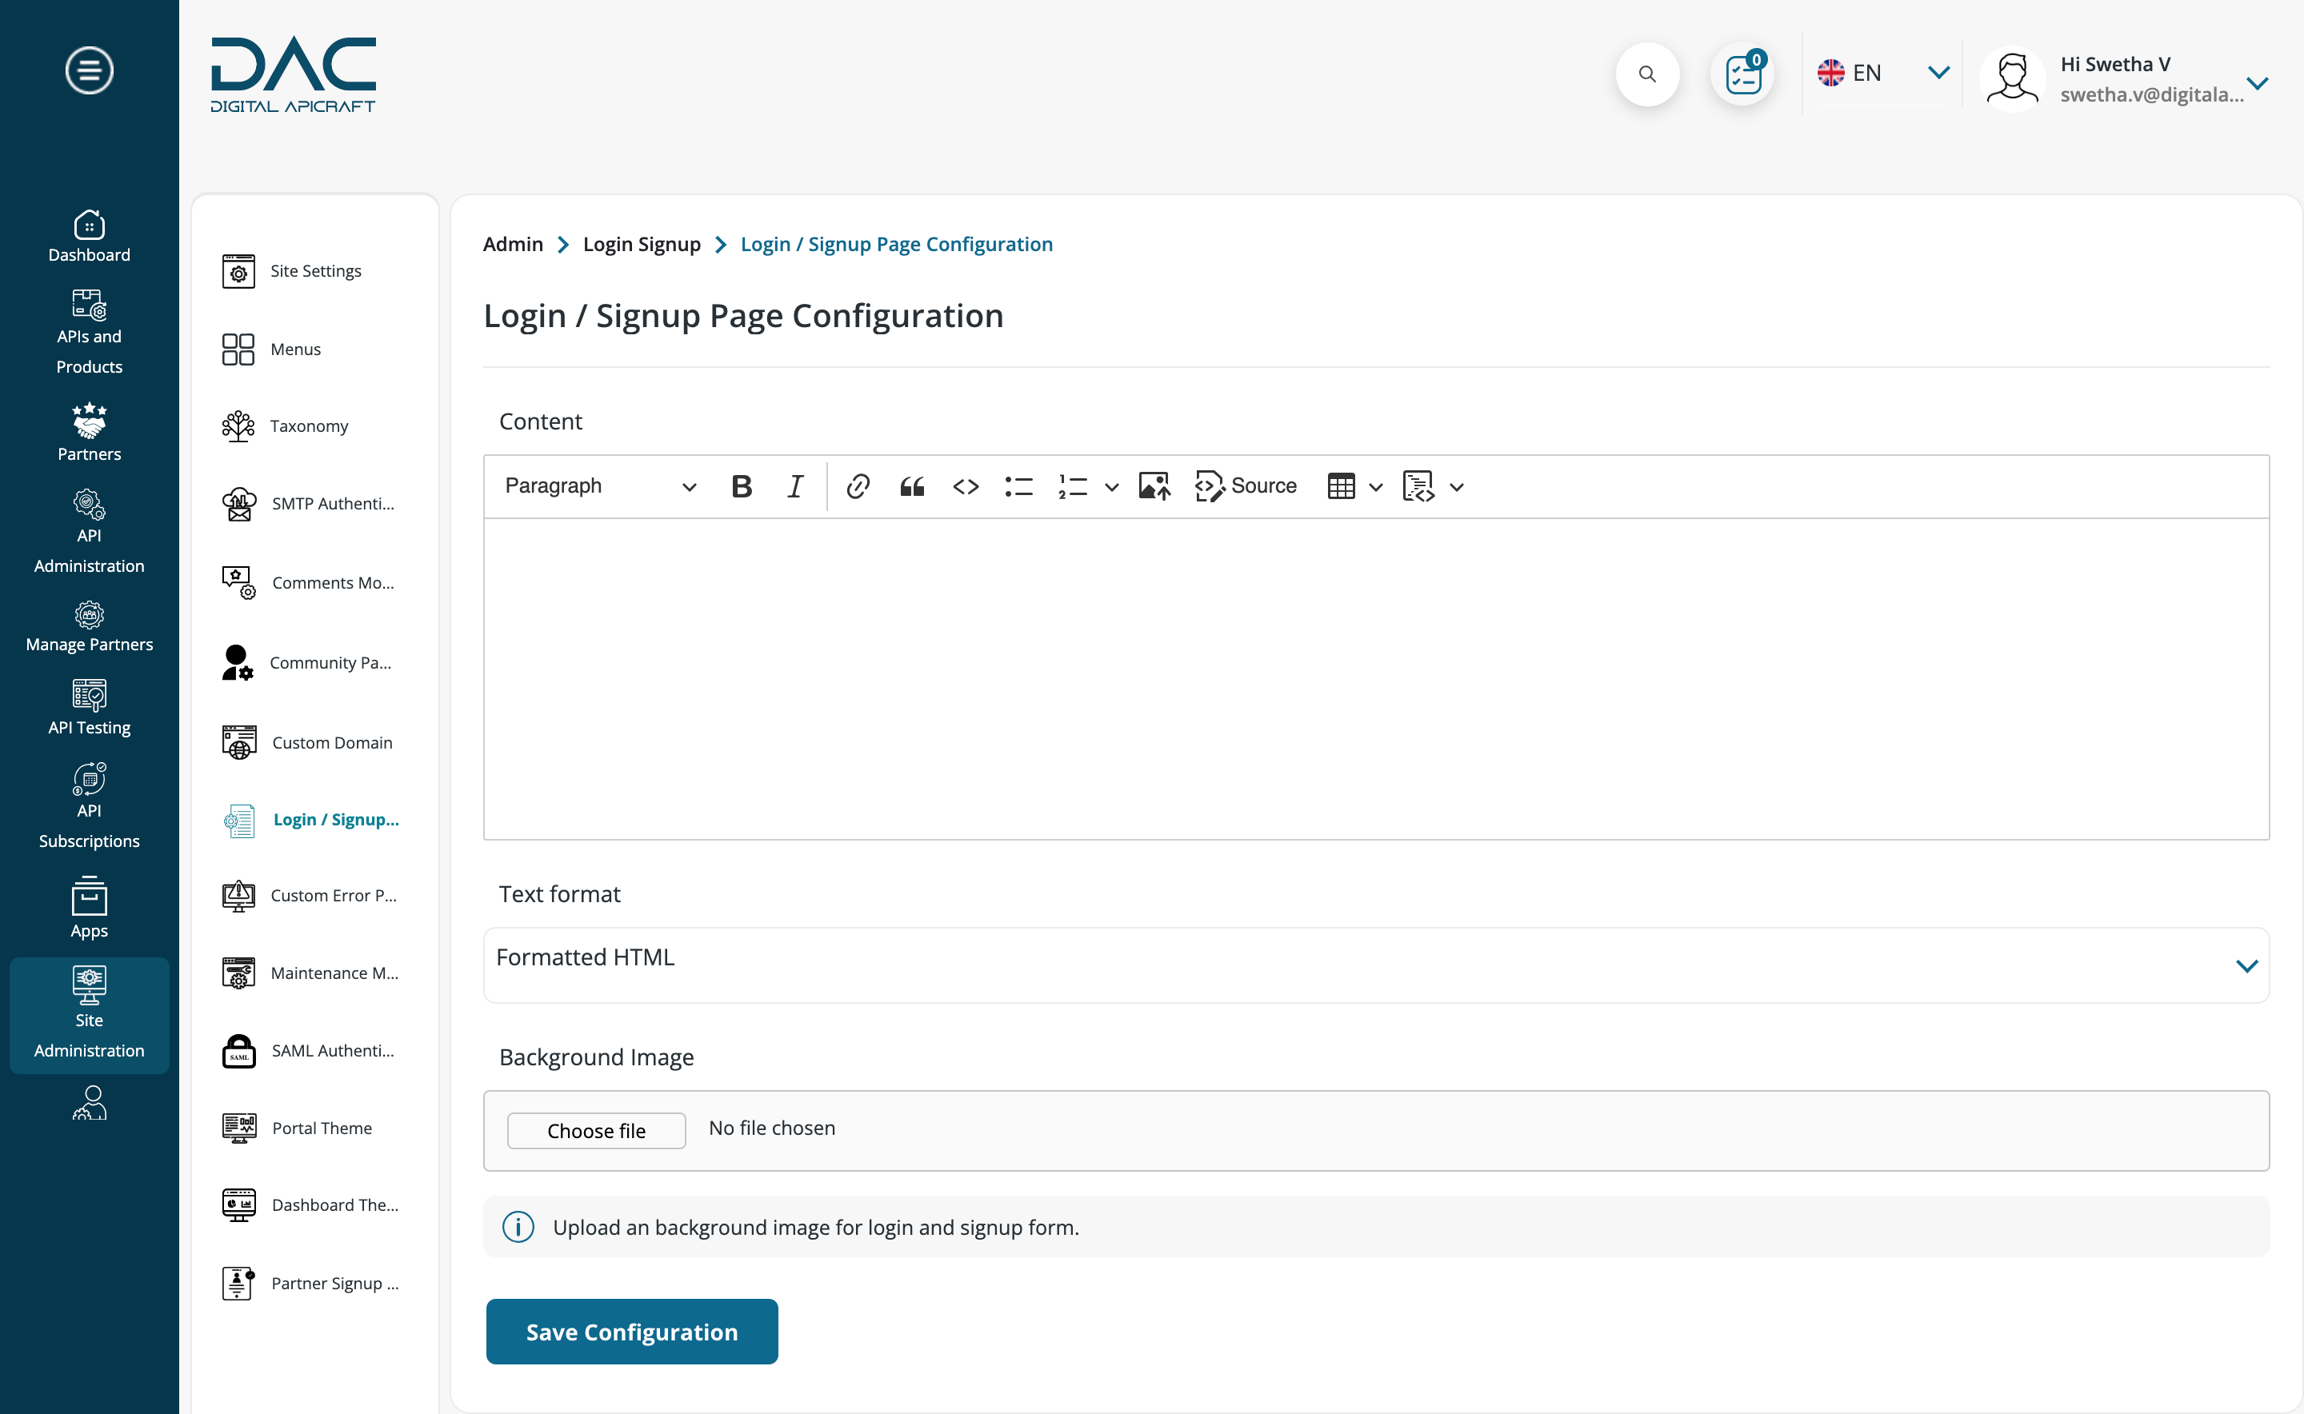
Image removed. Add content to display on the left side block of the login and signup pages. You can also change the background image
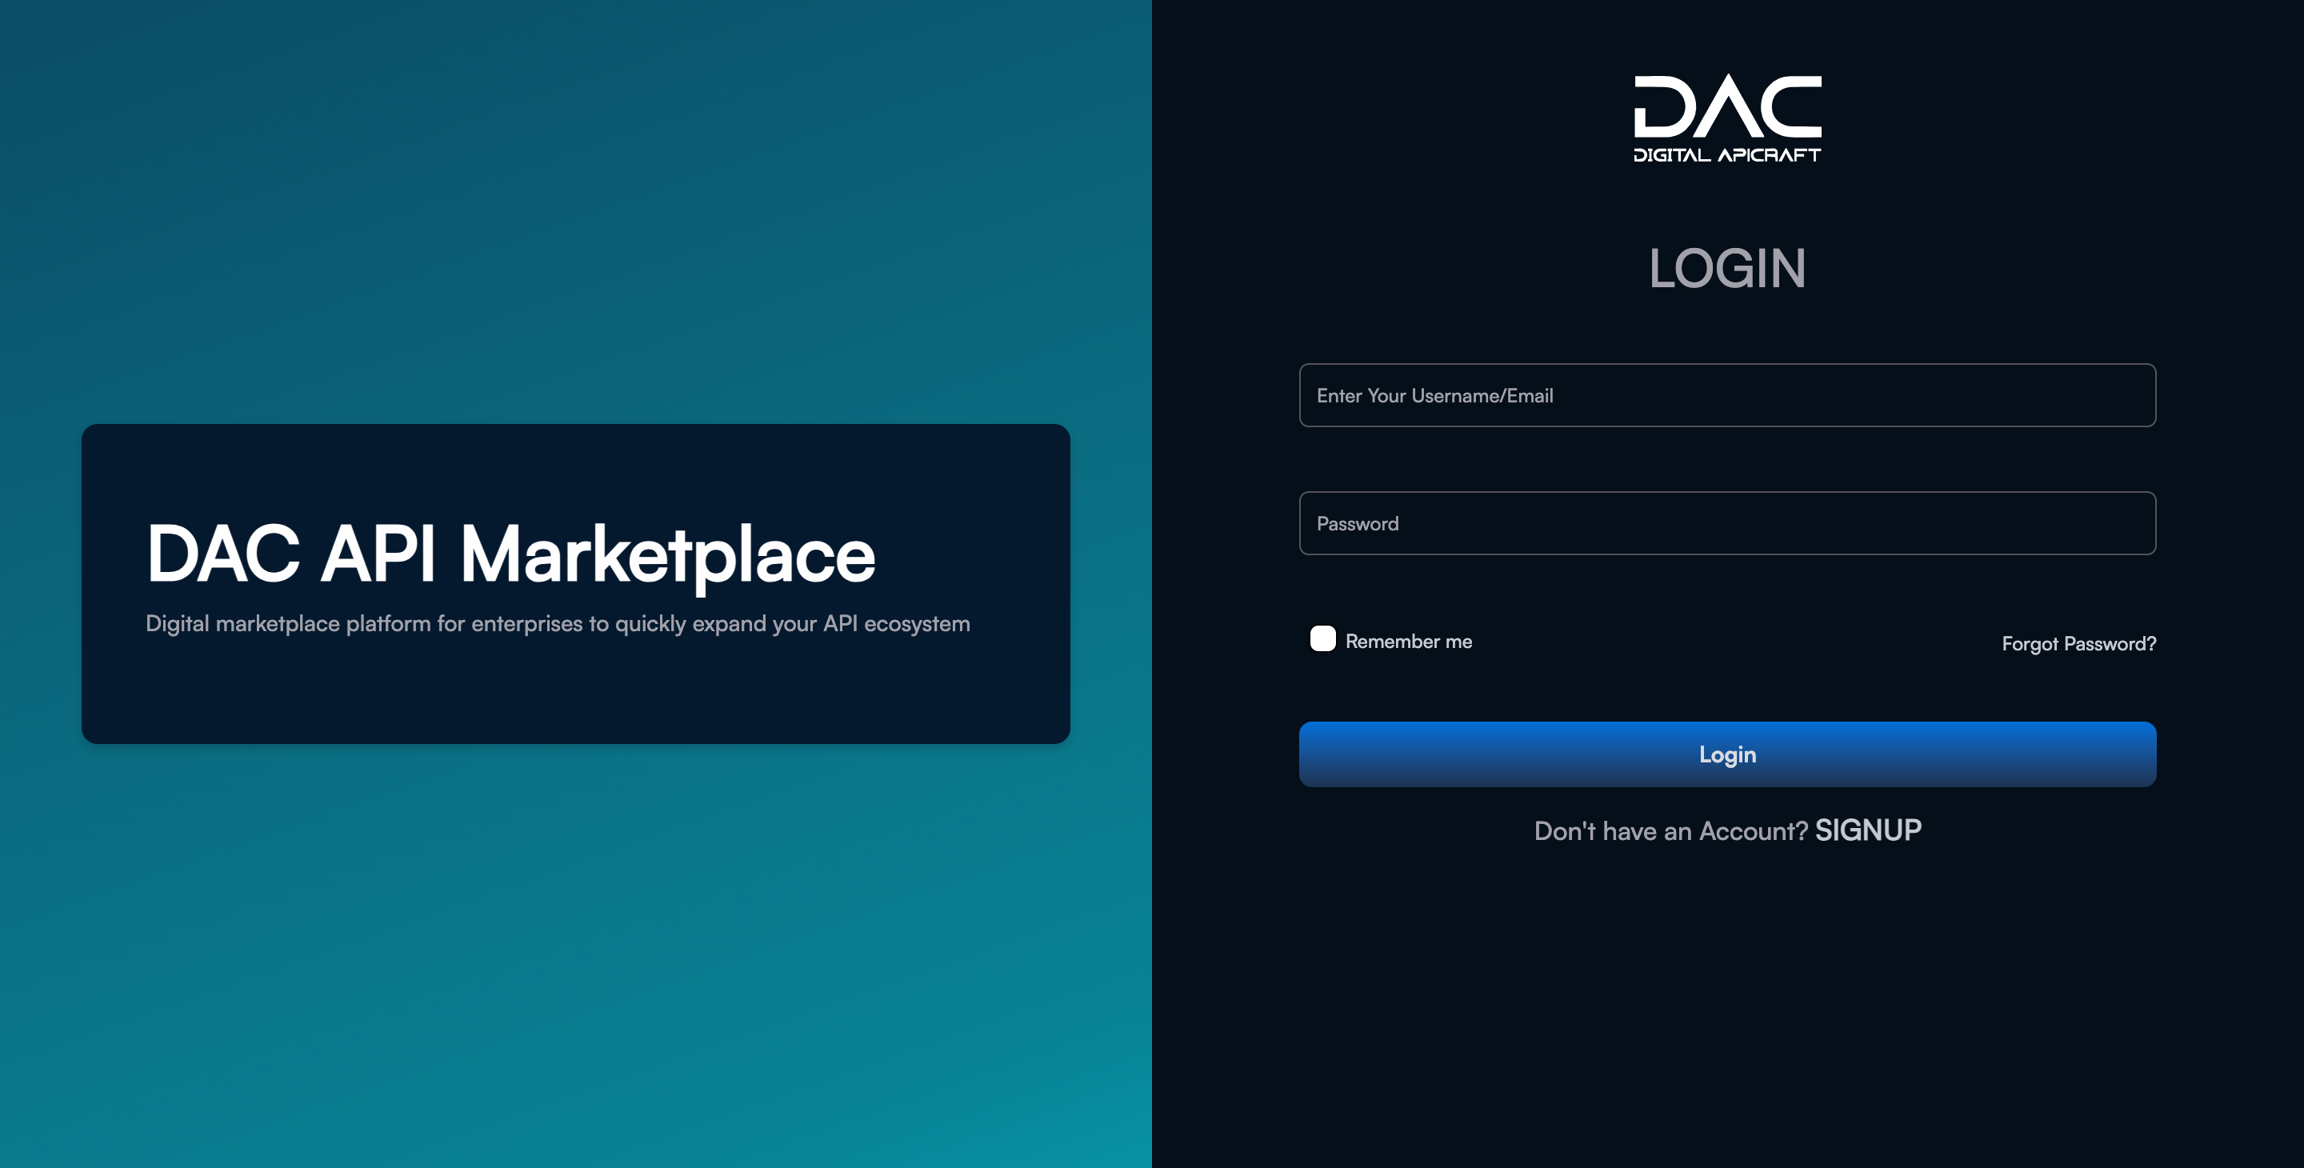
Image removed. 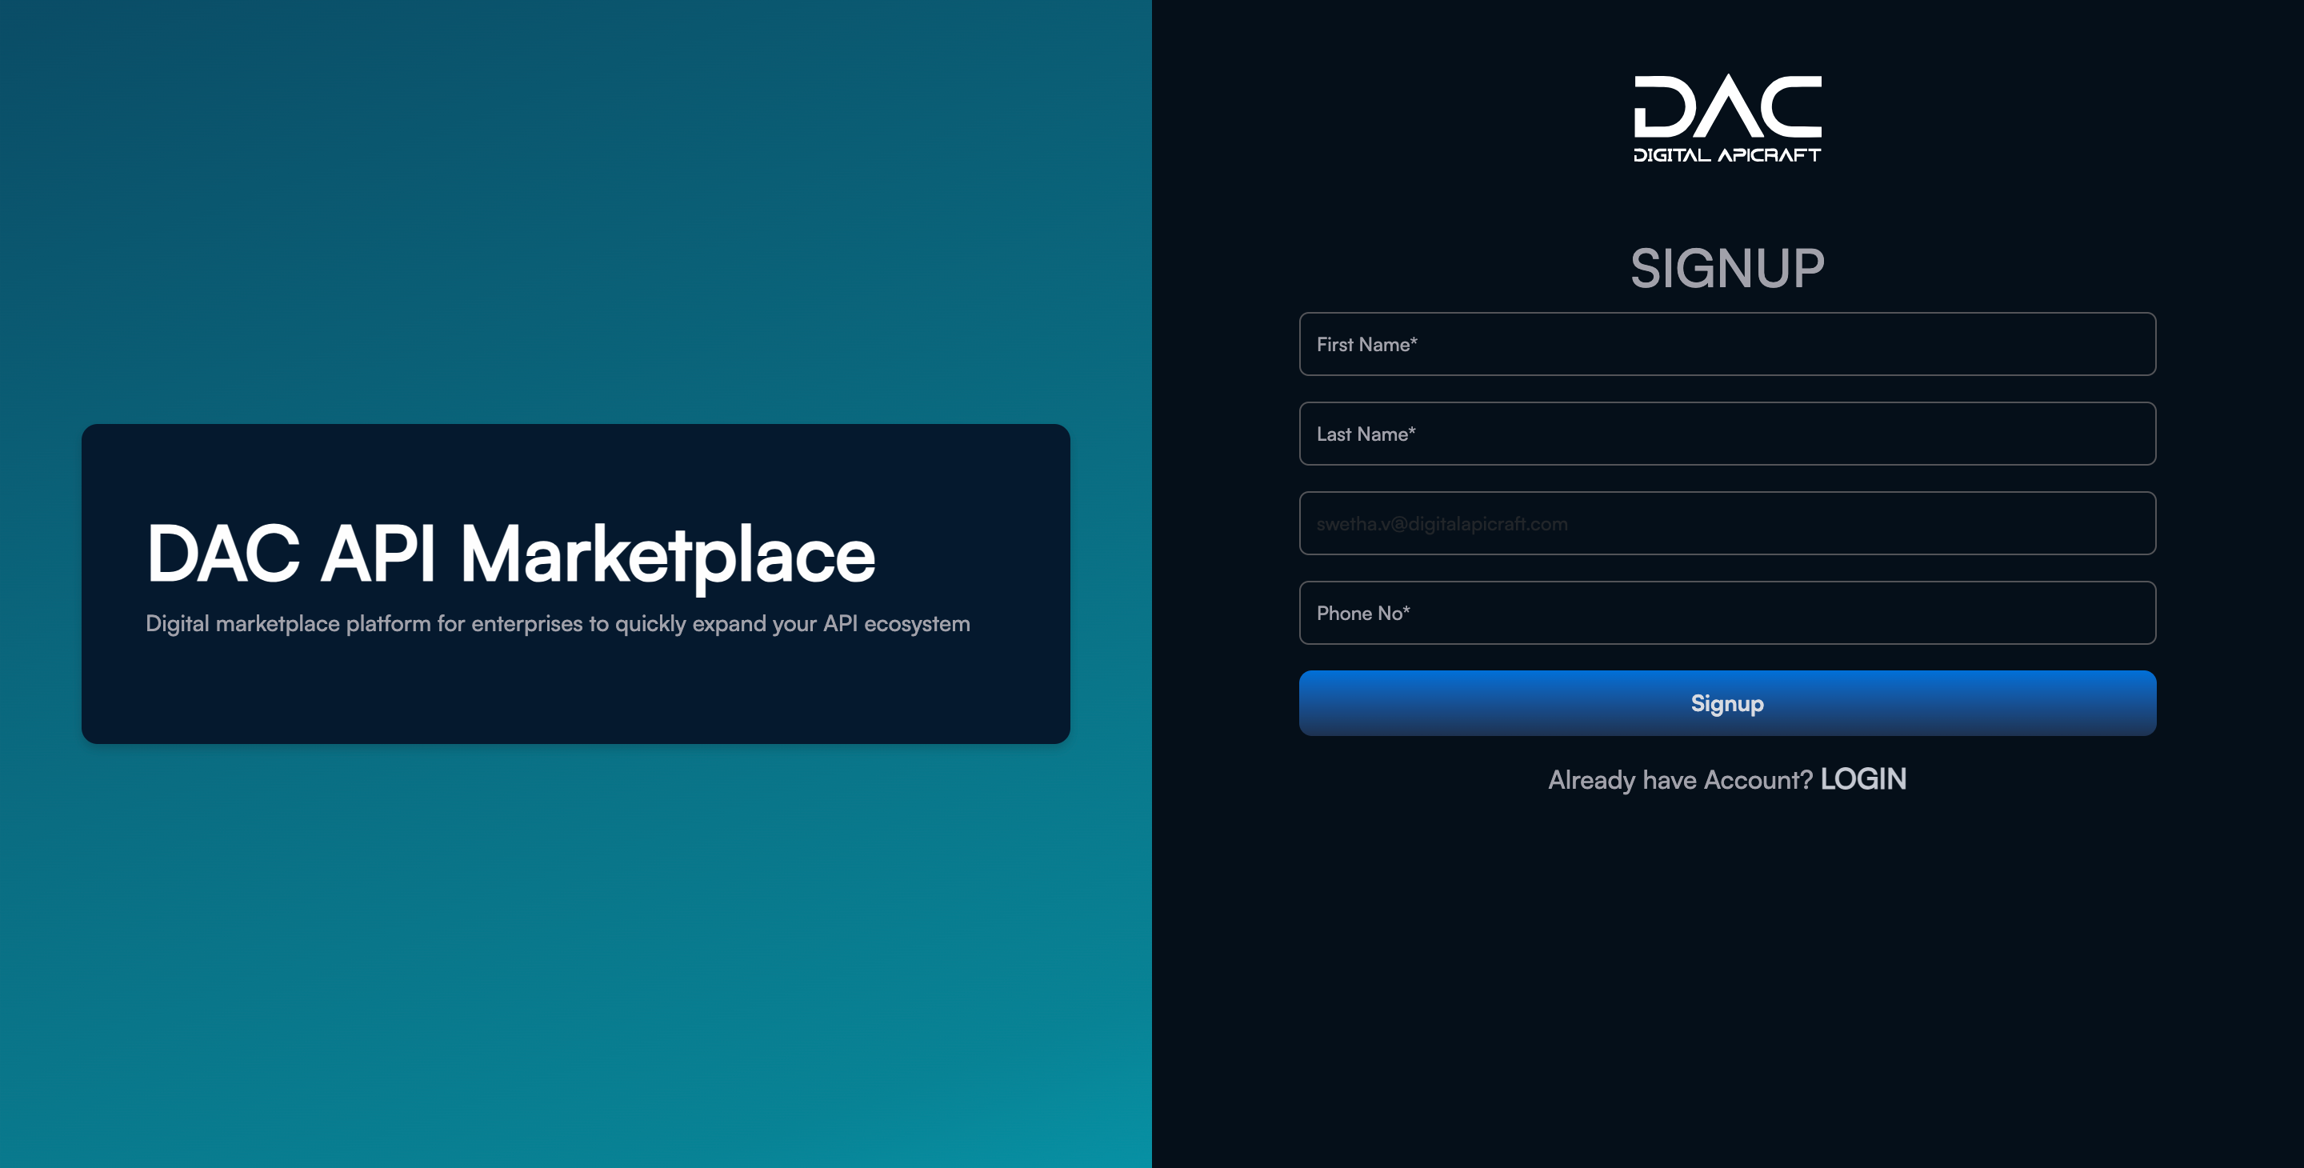
Image removed.
SSO Configuration
In an SSO configuration, there are two parties: a Service Provider (SP) and an Identity Provider (IDP).
An Identity Provider is a system that creates, stores, and manages digital identities. The IDP can either directly authenticate the user or provide authentication services to third-party service providers.
A Service Provider (SP) offers services to the end user but does not authenticate users. Instead, the SP relies on an Identity Provider (IDP) to verify the user's identity.
Below are the fields that need to be configured for a Service Provider:
Navigate to the following URL to configure the Service Provider in the portal: /admin/config/people/saml

Check the "Enable authentication via SAML" option to enable SAML authentication in the portal
Enter the Entity ID for the Service Provider
If the metadata needs to be signed, check the "Sign Metadata" checkbox
If a private key and X.509 certificate pair have been created, add them for the Service Provider
Navigate to the "Multiple SAML IDP Configuration" using the following URL: /admin/config/people/saml/saml-idp-config to set up the IDP

Click on "Add IDP SAML Config" to add a new IP configuration

Enter a label to identify the Identity Provider in the portal
Enter the IDP Entity Provider URL that is configured in the IDP metadata received from the client or the Identity Provider
Enter the Single Sign-On Service URL provided in the metadata
Enter the Single Logout Service URL provided in the metadata
Enter the X.509 certificate value provided in the metadata
Enter the login label to be displayed on the login page for SSO
Enter the unique ID attribute configured in the Identity Provider
Additionally, add the email attribute and the username attribute.(Note: In the portal, the email address itself is considered the unique identifier, so the unique ID attribute can be configured as both the username and email attribute.)
Click the "Save" button
By completing the above configuration, users will see the SSO button on the login page with the provided login button label.
The Assertion Service URL that needs to be configured in the Identity Provider is as follows:
Assertion Consumer Service URL: https://domain/saml/acs
The above URL is for configuring a single IDP. If multiple SSO configurations are enabled, the Assertion Consumer Service URL should be configured as follows:
Assertion Consumer Service URL: https://domain/saml_acs
Multi SSO
Login to the site as a Portal Admin
Go to Site Administration > SAML Authentication
Click Add SAML Configuration to start a new SAML setup

Service Provider (SP) Details
Entity ID: Enter the SP Entity ID, ensuring it matches the IDP configuration.

SAML Message Construction NameID Format: Enter the NameID format that aligns with the <md:NameIDFormat> tag in the IDP metadata

Identity Provider (IDP) Configuration

Example: IDP Meta data XML for OKTA Application

Label: Enter a label for the Identity Provider
IDP Entity ID: Enter the entityID value from the <md:EntityDescriptor> tag in the metadata
Single Sign-On Service: Enter the Location from the <md:SingleSignOnService> tag in the metadata
Single Logout Service: Enter the Location from the <md:SingleLogoutService> tag in the metadata
Certificate: Paste the certificate (<ds:X509Certificate>) value from the metadata
Login Button Label: Define the label for the login button (e.g., "Login with SSO")
Unique ID Attribute: Enter the unique identifier (e.g., email)
Username Attribute: Enter the attribute used for the username in the IDP configuration (e.g., email)
User Email Attribute: Specify the attribute for the user’s email (e.g., email)
Enabled: Toggle to enable or disable the SSO login functionality
OpenID Connect
Login to the site as a Portal Admin
Go to Site Administration > OpenID Connect Configuration Fields:

Client ID - Configure this value from the IDP
Client secret - Configure this value from the IDP
Authorization endpoint - Configure this value from the IDP
Token endpoint - Configure this value from the IDP
UserInfo endpoint - Configure this value from the IDP
Logout Redirect URL - Enter the domain URL to redirect users after logout
Login button text - Set the label for the OpenID Connect button that will appear on the login page
User claims mapping - Map the user response values from the IDP to the application (e.g., First Name)
Dynamic Filters
This feature enables the Portal Admin to add filters on the API Discovery and Product Listing pages without configuration changes or developer intervention. The Portal Admin can adjust filter labels, lists, and positions as needed, with no restriction on the number of filters or filter items that can be added.
Adding Filters to the API Discovery Page
Navigate to Site Administration >Taxonomy

Click on Add Terms for the taxonomy labeled API Filters.

Create a Vocabulary Term by adding the following details: Name: Name/Label of the filter Parent Term: If left blank, the term will be added as a new filter
If a value is selected, the term will be added as a filter list value under the chosen parent term Description: A description of the filter

Once the filter is added, it will appear in a hierarchical list, where parent terms represent filters and child terms are filter values or options (e.g., Domain, Markets/Regions).

Navigate to APIs and Products > API Discovery to view the added filters, such as Domain and Markets/Regions.
An API Tags filter is also available in the views. The Partner filter appears if the Partner Feature is enabled.

Tag API Content by Filter:
Navigate to API Administration > Content > Filter Content by API. Edit an API entry to tag it with relevant filter values (e.g., Domain, Markets/Regions) using the select list box that appears


Once tagged, the content can be filtered on the API Discovery page.
Adding Filters to the Product Discovery Page

Navigate to Site Administration > Taxonomy

Click on Add Terms for the taxonomy labeled Product Filters

Create a Vocabulary Term by entering the following information: Name: Name/Label of the filter Parent Term:
If left blank, the term will be added as a new filter If a value is selected, the term will be added as a filter list value under the chosen parent term Description: Description of the filter Once added, the filter will appear in a hierarchical list, with parent terms as the filters and child terms as filter values (e.g., Domain)

Navigate to APIs and Products > Product to see the added filters (e.g., Domain)


Tag Product Content by Filter:
Navigate to API Administration > API Products

Edit a product entry to tag it with relevant filter values (e.g., Domain) using the select list box that appears.
Once tagged, the content can be filtered on the Product page.

